Panel Integration
Introduction
From this tab you can define the URL parameters that will be accepted by your survey. (These parameters will be attached to the general survey start URL). This option is important if you want to integrate your survey with a professional survey panel provider that provides the participants for you. The latter usually provides the unique ID of every survey participant and you will need to save these unique IDs for further reference.
Survey's panel integration: Settings > Survey menu > Panel integration
Survey panel integration
An empty table will be displayed with the option that allows you to add an URL parameter.
Two fields need to be filled out:
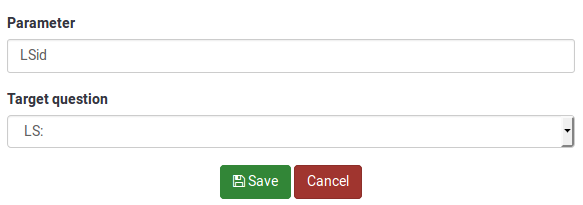
- Parameter: The name of the new parameter. It will be included in the URL;
- Target question: Generally, the URL parameter is saved as a question. It is where survey participants will land once they click the link that also includes in its URL the parameter defined above.
How to use the panel integration function
An example is presented below to explain how to use the panel integration function.
1) First, create a short/long free text question and name it what ever you want (we will use "LS" for the Question code field). Then, enable the always hide this question option, located under the Display tab within the menu of the question.
2) Go to the panel integration tab, and click the "Add URL parameter".
Select the short/long text question you created in the first step. The participants that come from the respective professional panel provider will land on the target question. It can be hidden so that the participants can start completing the survey.

The name you pick for the parameter will have to be included in the entry link that you will later supply to your panel provider. It will be named "LSid" in our example. Don't forget to click the Save button located in the upper right part of the table!
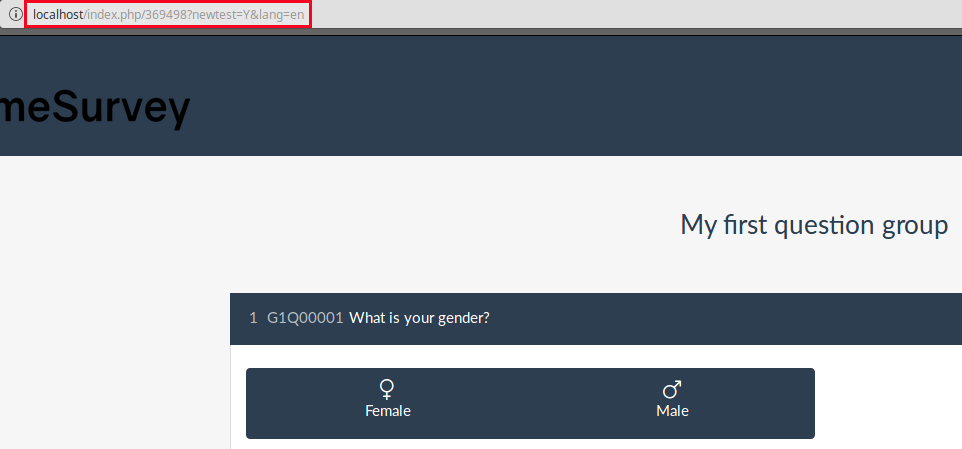
3) Now, you have to set up the entry link that you will send to the your panel provider. To get your survey URL link, click the Preview survey buttons.

Copy the URL you accessed from the address bar:

Add at the end the newly added parameter: &LSid="xxxxxx". The link should look like this:
http://localhost/index.php/369498?newtest=Y&lang=en&LSid=%22xxxxxx%22
Whatever you replace the "xxxxxx" with will be stored in the short/long free text question when your participants lands on that page. For example, I sent to a user the following link:
http://localhost/index.php/369498?newtest=Y&lang=en&LSid=ABCD5The string after LSid was stored as an answer to the short/long text question.

The complete link
The complete link has to be inserted into the end URL field that also has to be loaded automatically for everyone who successfully completes the whole survey.
The URL you have to send back to the panel provider should look like this:
https://panelproviderwebsite.com/?return=complete¶metername={PASSTHRU:parametername}The screenout link
A screenout prevents the participants from continuing the survey because he or she is not a member of your survey target group. For screenouts, you have to set the quota limit field to "0" (zero) and allow the quota URL to be automatically loaded once it was triggered.
Then, add the following link into the quota URL field:
https://panelproviderwebsite.com/?return=screenout¶metername={PASSTHRU:parametername}
https://panelproviderwebsite.com/?return=screenout¶metername={PASSTHRU:parametername}
The quotafull link
A quotafull excludes participants from continuing the survey, because a certain quota has been exceeded.
https://panelproviderwebsite.com/?return=quotafull¶metername={PASSTHRU:parametername}
This is not the only solution you can use to implement quotafull, complete and screenout redirects to your panel provider! For example, the ExpressionScript - Presentation, the SQGA identifiers, and the URL fields offer different workarounds to complete the same tasks (and even the more complex ones). For additional help, check also the LimeSurvey forums
Survey panel integration via expressions
Related Articles
Overview - SETTINGS
Overview - SETTINGS Survey settings and Survey menu are located under the Settings tab. Survey settings The items under Survey settings allow users to edit different survey-related settings. The following are the Survey settings. Click each of the ...Overview - Survey Menu
Survey menu Under the Settings tab, you will find Survey settings and Survey menu. The following will cover the Survey menu. The following are settings under Survey menu and a brief explanation of each: Question list Group list Reorder ...Notifications & Data
Notifications & data To save response-related details to the responses tables, access this panel. You can save the referrer URL, IP address, timings, etc. that can help you produce more in-depth analyses. LimeSurvey allows you to use the tracking ID ...Text Elements
Text Elements From the Survey text elements panel, you can edit the title of the survey and its description, welcome and end messages, end URL of your survey, and the format of the decimal mark and date. To view or change text elements, from the ...Publication & Access
Publication & access This setting allows the survey administrator to choose the way the survey can be accessed by survey participants (e.g., CAPTCHA codes can be used to increase the security of your survey). Also, here is where you can set a ...